|
Italaerei 1/72 Republic RF-84F Thunderflash by Vince Tassone |

|

Click the STORMO! Eagle to return to the Gallery |
|
A development of the iconic F-84F fighter-bomber. The need for a high speed photo reconnaisance aircraft was a direct result of experiences gained during the Korean conflict. Korea pointed to the need for a reconnaissance aircraft which would be able to either evade an enemy, or engage and defeat him. The enemy would be the Soviet Union, or one of its allies, and they would be equipped with MiG interceptors, including the MiG-15 which easily handled all the recon types used in Korea. The Air Force needed a recon aircraft with twice the range, and another 100 mph top speed. The RF-84F would fill these requirements. The reconnaisance version of the F-84F evolved from the No.2 prototype YF-84F, which had the slender, pointed nose with the air intakes embedded in the wing roots. Although the concept had been abandoned on a fighter-type (F-84F) because of a loss of thrust from the design of the wing root intakes, the Air Force and Republic Aviation found the design ideal for a reconnaissance version. The intakes were enlarged, as was the wing itself, and the pointed nose gave way to a slender, somewhat blunted nose that could house six cameras. In addition, four M3 .50 calibre machineguns were mounted under the outer edge of the wing root intake lip. Engine, flight control systems, cockpit and canopy, and the landing gear were all shared with the F-84F. The RF-84F also introduced a number of innovations including computerized controls which adjusted camera settings for light, speed, and altitude, a periscope to improve pilot visualization of the target, and a voice recorder to allow the pilot to narrate observations. Sharing so many common parts with the fighter-bomber version also meant the RF-84F shared the same problems associated with the entire F-84F program. Wing forging problems led to a four month delay between delivery of the second production aircraft, in September 1953, and the third, which didn't roll out until January 1954. In April 1954, problems with the J65-W-3 engine set the RF-84F program back a full eighteen months. It wasn't until November 1955, when sufficient quantities of the J65-W-7 engine became available, that RF-84F production resumed. The US Military Assistance Program (MAP) also sent RF-84F aircraft to its allies. Almost all the RF-84Fs went to NATO since most were also flying the F-84F. Germany received two squadrons, while France, The Netherlands, Denmark, Norway, Greece, and Turkey got one squadron apiece. In the Far East, only Nationalist China (Taiwan) opted for the RF-84F, with Japan and South Korea buying RF-86F Sabres, which were compatible with their fighter arms equipped with F-86F fighters. In all, 327 RF-84Fs were built for MAP sales to other nations. The US Air Force bought a total of 388 before production ceased in December 1957. In December 1955, the Strategic Air Command began equipping the 71st Strategic Reconnaisance Wing (Fighter), with RF-84Fs and specially built RF-84Ks. The RF-84K was a modified RF-84F capable of an inflight hookup with a GRB-36 mother ship. The GRB-36 would carry the parasite RF-84K to the target area, drop him to perform his mission, then retrieve the fighter and bring him home. The project was called Fighter CONveyor, or FICON. The RF-84K had a large hydraulic hook attached to the upper part of the nose, directly infront of the windscreen. An added pair of hooks were fitted to the upper portion of the aft fuselage. To enable the RF-84 to clear the B-36 bomb bay, the horizontal stabilators were angled down at 45 degrees from the horizontal. The project had been tested in 1952 with a straight-wing F-84E. In 1953, the original YF-84F prototype, serial 49-2430, was modifed with the retrieving apparatus and drooping stabilators. It flew for the first time on 30 march 1953, with FICON tests continuing until 1955 when production aircraft began arriving. The 91st SRSq, based at Larson AFB, Washington, received 25 RF-84K FICON aircraft. They were teamed with the GRB-36Ds from the 348th BSq based at Fairchild AFB, Washington. Tactical Air Command replaced its RF-84Fs, including the ones inherited from SAC, in 1958 with McDonnell RF-101 Voodoos. Most of the RF-84F/Ks were sent to Air National Guard (ANG) units. Seven squadrons were operational in the Guard. When the Berlin Crisis erupted in 1961, the 117th Tactical Reconnaisance Wing, Alabama Air Guard, was activated for possible service in Europe. When the crisis was defused, they and their aircraft were returned to the control of the State of Alabama. Rapid replacement of RF-101Cs in the Air Force by the McDonnell-Douglas RF-4 Phantom brought a supersonic capability to the Air Guard recon effort. The RF-101 Voodoos replaced the RF-84Fs in Guard service. On 26 January 1972, pilots from the 155th Tactical Recon Group, Nebraska Air Guard delivered the last operational RF-84F to the Davis-Monthan aircraft storage and reclamation facility. The Hellenic AF continued to operate RF-84Fs as late as 1988. In Aeronautica Militare Italiana (AMI) Service: Italy operated 78 RF-84Fs from 1956 until 1974. The Thunderflash would equip 3o Stormo. This unit, initially a fighter wing 3o Stormo Caccia had been transferred from Bari to Verona-Villafranca in March 1954 and from June it began receiving the F-84G Thunderjet (fighter-bomber) and from December the first Thunderflashs began to arrive. Towards the end of the same year 3o Stormo Caccia was redesignated 3o Stormo Ricognitori (Reconnaissance). Reference: F-84 Thunderjet in Action, Squadron/Signal Publications, Aircraft Number 61 |
|
|
|
|

|

|
|
|
|
|
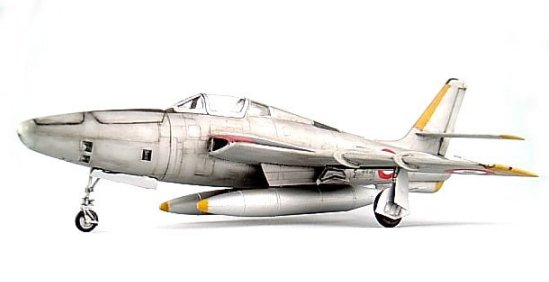
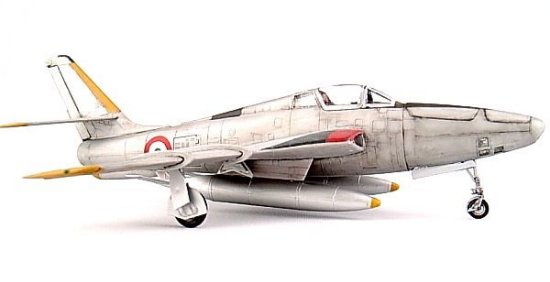
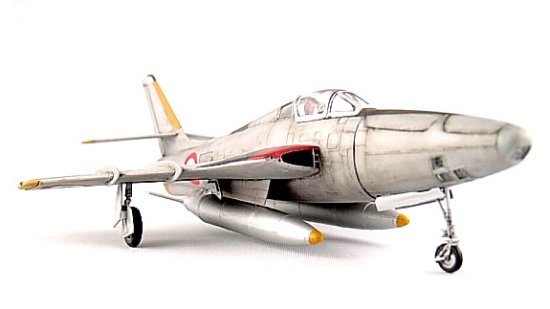
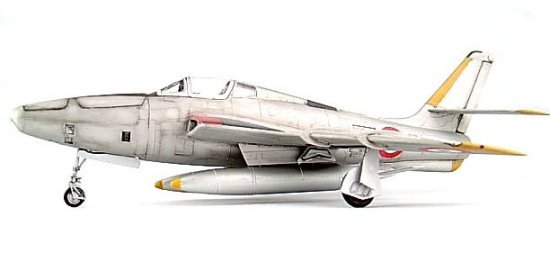
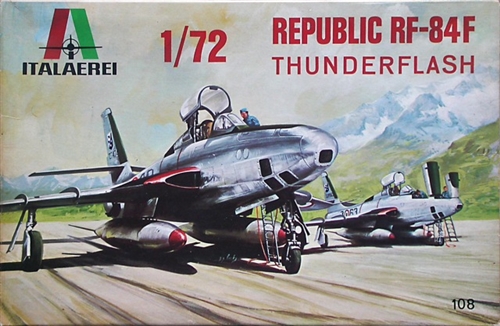
The Model This is the Italaerei (Italeri) 1/72 Republic RF-84F, Kit No.108. The model was first released in 1974 and its predecessor the Italaerei 1/72 F-84F fighter-bomber was released in 1972, making the kit about 44 years old - more about this later.
The instructions are very simple and include 4 instruction panels or steps, one instruction panel/step is devoted to displaying the model in-flight. There are 2 sprues in a shiny/glossy 70s-like soft gray plastic that reacts well to liquid glue. There's one clear sprue that includes a display stand for the model in-flight. There are 63 parts in total. Surface detailing is raised and lessens the need for washes although I applied a wash to mine. There's no cockpit, which is typical of this era except for a seat and the top portion of an instrument panel; there are no instrument gauges or an instrument panel however an after market CMK resin cockpit for the Tamiya kit is available for the F-84F that fits this kit as well as the Airwaves PE set used to represent the seat, cockpit tub and instrument panels, intended for the Italeri F-84F but can be used for this kit. Decals and color options for two planes, an AMI and a Belgium plane. The box is branded as an Italaerei kit which was the original name of Italeri when Italeri's focus was solely on aircraft. I bought this kit from Uncle Rick's Hobbies in Calgary about 15 yrs ago for $10.00 CDN and started on it and then put it away because of the raised panel lines and the fairly large gaps in the wing roots. I didn't like the idea of using so much putty which tends to create more problems than it solves and would have damaged the raised panel lines around this area. Fast forward to 2018 and the release of the spectacular Tanmodel 1/48 RF-84F, the availability of new building materials and Salvatore Barresi's SEM Model 1/72 Aerfer Sagittario II on Stormo, I thought I'd revisit the assembly of this kit. The first thing I did was apply Mr.Surfacer 1000 from a bottle using a clean 10/0 brush to the wing root gaps. I applied a few layers of Mr.Surfacer and sanded it using 600 grit sand paper. This worked well and the raised panel lines remained intact without sign of a gap in the wing roots. Use cellulose or lacquer thinner to clean your brush when your done using Mr.Surfacer. From that point, assembly is straight forward. Aside from the wing roots and tail planes that also needed Mr.Surfacer, the fit is generally pretty good considering the age of the kit. Be sure to get the dihedral of the wings correct since the landing gear struts attach flush to the wings at 90o degrees using a unique square attachment point that makes the land gear assembly very easy and precise. The 450 gal droptanks snap onto the wing pylons and don't need to be glued, in fact there should be a slight gap between the droptanks and pylons. The pylons can be mounted flush to the wing. Four gun holes were drilled out at the air intakes. Add some noseweight since the model tends to be a tail-seater, but you can still get away without it. Clear Parts The clear parts for the nose cameras were attached using Tamiya Liquid Cement and worked well with no fogging. However I would recommend dipping the parts in Future (to prevent fogging) and then applying a small amount of elmers glue around the edges of each clear part as a sealer and then apply CA for a stronger bond since the clear parts can come apart during masking and painting and it will be difficult to reassemble if accidentally dislodged after the fuselage halves are glued together. The two part canopy was left in the closed position because I did not detail the cockpit. The windscreen and canopy were dipped in Future. Painting Testors/Model Master Metalizers come in two types, buffing and non-buffing metalizers. As the names imply, there's no need to buff non-buffing metalizers, in fact its recommended that you don't. As with my P-51 (a commission build), the results are outstanding, absolutely no graininess whatsoever and are easy to use and durable. The plane looks like it was made from aluminium metal. I was perplexed by the reviews of these paints and why so many people were having trouble with them so I took a closer look into this matter to understand why this was happening. I went onto Testors site and they recommend to spray their metalizers directly unto an unpainted-unprimed (plastic) surface. See Section 3 of this link. I found this recommendation odd and so I tried this on clean plastic, sealing the paint and using low tack Tamiya tape, and sure enough the paint peeled-off easily. Metalizers need a primer. Here are the steps I use to spray Testors/Model Master Metalizers: 1) Clean the model of any oil or mold release 2) Spray a light coat of Mr. Surfacer 1000/1200 (let dry 2 hours) 3) Spray Testors/Model Master Metalizer (let dry/cure 1 day) 4) Spray Testors/Model Master Metalizer Sealer (let dry/cure 1 day) - 1 or 2 light coats Metalizers and sealers dry extremely fast within 15 mins, however allowing a day to cure is a good idea. I used non-buffing Aluminium plate for the droptanks and buffing Aluminium plate for the rest of the plane with no noticeable differences. The air brakes on the fuselage sides aft of the wings were painted with Testors/Model Master Metalizer Steel. The red and black panels on the upper-wings were painted over the metalizer. The anti-glare panel was painted with Testors Olive Drab. Yellow tips applied over metalizer using Polly Scale RLM 04. Yellow markings were tactical squadron markings that also apppeared in red and green and were used similarly by RF-84Fs of other NATO countries. The canopy frame was painted using Testors Silver enamel 1146 + Model Master Airbrush Thinner 1799 over a flat black acrylic under coat and sprayed-on surprisingly well, without signs of graininess. This was an interesting observation since the durability of enamels is better than metalizers and you can easily obtain different shades of metal by simply adding black, not to mention being significantly cheaper and more accessible. I'll explore this in the next all-metal plane I build. Cockpit interior and wheel wells were painted Gunze H-58 US interior green. The top of the rudder was painted Gunze H-338 US Marines F-18 Light Gray FS.36495 + flat black tip.
Decals Decal options are provided for two planes, an AMI machine 3o Stormo, 3-26, MM.27392 and a Belgium machine H8-W. The decals in the kit were severely yellowed. I was able to remove the yellowing entirely and easily by bleaching the decals in sunlight for 3 days. I then applied the decals onto the model following the usual procedure and the decals appeared to go on beautifully. I returned after 1 hour to apply solvent and found the decals curled-up and completely off the model. I applied clear over the decals in an attempt to salvage them and although the decals adhered somewhat they still curled at the edges but more importantly I couldn't use solvent; solvent is especially important here because of the raised panel lines (Note: in retrospect I proably should have applied solvent from the beginning to disolve the carrier film, possibly reducing curling - this might have saved the decals). Over the years, because the decals were not bagged, moisture activated the adhesive layer on the decal sheet. The decals stuck to the sheet backing paper but once off could stick no more. I looked around for an aftermarket AMI sheet however none existed except for the excellent Daco Products sheet No. DCD7231 for bare-metal Belgium RF-84Fs which even contain decals for the red and black upper-wing panels and the correct shape of the anti-glare panel ahead of the cockpit. Italeri recently re-issued this kit No.1108 with some improvements such as an exhaust tube which is missing in this kit and possibly a cockpit. Unfortunately the decals in No.1108 are for a different squadron and painted differently. So sadly I was forced to dig into my stash of AMI roundels, a real pity and the plane remains unmarked. The lesson here is that if you buy a 44 yr old kit, don't expect the decals to work and if you aren't aware of an aftermarket sheet of your favorite plane, you may have no other option than to create stencils yourself which can be problematic and not worth the trouble. Weathering Weathering this model was no easy task especially in this scale since there's a tendency to wipe away the wash, and contrary to what I was expecting the wash did not settle well along the raised panel lines. Anyway, I sprayed a couple of coats of Polly Scale Gloss, applied artist oils (black and white) using a large flat wide brush. Allowing the wash to dry I then wiped away the excess wash and sprayed a final coat of flat.
Other You can get this kit No.108 on ebay for about $30.00 USD. I think a better alternative and even far less expensive is the recent re-issue of this kit + some kit enhancements as mentioned above + new decals, in Italeri kit No.1108. What could I have done better? The anti-glare panel could have been rectangular or use the Daco Products sheet No. DCD7231 for the decal. Use the CMK resin cockpit detail set since the cockpit contains nothing other than an incorrect ejector seat or use the Airwaves PE Cockpit Set - as described above. Conclusions Would I build this kit again � well this is an old kit and with it comes shape issues in the canopy, the fuselage, the tail plane and presumably the wings as well. If you don't mind building jets in 1/48 I recommend building the spectacular Tanmodel 1/48 RF-84F. The Tanmodel is the only 1/48 kit that has recessed panel lines + incredible detail including highly detailed recon cameras and was designed using 3D scanning technology making it ultra accurate. PJ Production makes a 1/72 resin kit of this plane that's accurate and has recessed panel lines, although I don't believe the kit comes with AMI decals and is expensive. If you want to build a low-cost 1/72 plastic-model of an AMI RF-84F use Italeri No.1108 since the decals in No.108 probably won't stay on and there's no aftermarket AMI sheet to replace what's in the kit. The raised panel lines present a challenge during weathering. On the positive side, this kit builds up quickly, the wheels rotate nicely, and some of the assembly features are masterpieces of simplicity that I well appreciated and is a good example of how kits really should be designed, as well, the final model basically looks like an RF-84F and is attractive. |


|
|
Aircraft: Republic RF-84F Thunderflash Manufacturer: Republic Aviation Corp. Type: Reconnaissance Year: 1953 Engine: One Wright J65-W-7 turbojet, 7,800 lb (3,540 kg) thrust Wingspan: 33 ft 7 in (10.24 m) Length: 47 ft 7 in (14.52 m) Height: 15 ft 0 in (4.57 m) Weight: 28,000 lb (12,700 kg) (Loaded) Maximum Speed: 679 mph (1,092 km/h) at sea level Ceiling: 46,000 ft (14,020 m) Range: 2,200 miles (3,540 km) Armament: 4 x .50 cal machine guns Crew: 1 |
|
|
|
|
|
|
|
|
|||||||||
|
|||||||||
|

|
|
|
|


|


|
|
|
|
|
|
February, 2018 STORMO! © 2018 |