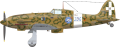
Here are some pics of my latest completed model. This is 1/72nd scale AML version of the AerMacchi C200. The aircraft chosen is of Ten. Franco Lucchini during August 1941. I used Skymodels C200 sheet for the decals. I don't know what anybody else thinks of this kit. Is there a better kit out there for this type? I thought it was quite a bit of work with poor fit of parts and I was not pleased with the undercarriage, which has quite thick plastic parts. I tried to improve it and add a little detail.
Cheers Dave.


 [/img]